40 Must Have Cheat Sheets For Graphic Designers And Developers

A cheat sheet or crib sheet is a concise set of notes used for quick reference. “Cheat sheet” may also be rendered “cheatsheet”. In the graphics world, cheats sheets are there to help the designers in completing their design applications easily. At times, designers get stuck with the design process and they do not know where to get help from. Cheat sheets can give them a good refresher on their desired topic.

For this round up, we are presenting a useful collection of 40 cheat sheets for the designers and developers. We hope that these cheat sheets will be helpful for them. Do let us know what you think about this collection via comment section below. Enjoy!

HTML Cheat sheet

HTML is the language of the web. It is the semantic support on which websites depend. This A4 reference lists the various tags available to the web designer, as well as a selection of useful character entities, attributes and events.

CSS Cheat sheet

The CSS cheat sheet is a one-page reference sheet, listing all selectors (as of CSS 2.1) and properties. It includes a visual example of the box model, unit reference for CSS units and the various media types CSS makes allowance for.

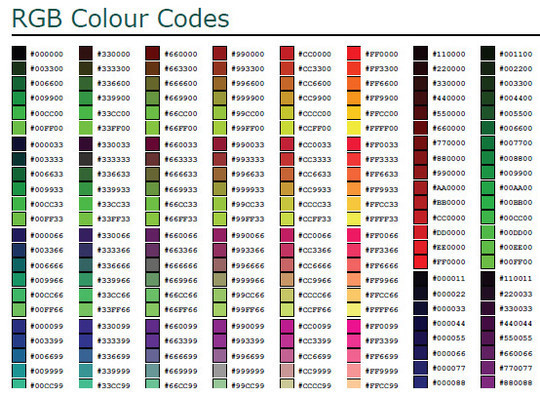
RGB Hex Colour Chart

A free, printer-friendly RGB Hex colour chart for web designers.

CSS 2.1 and CSS 3 Help Cheat Sheets (PDF)

These cheat sheets will help you quickly look up the right CSS 2.1-property or an obscure CSS 3 property. The style sheets contain most important properties, explanations and keywords for each property.

HTML 5 Cheat Sheet

A handy printable HTML 5 Cheat Sheet that lists all currently supported tags, their descriptions, their attributes and their support in HTML 4.

Megapixels and Maximum Print Size Chart

Each colored box represents a certain number of megapixels. The numbers along the top and left side are print dimensions in inches at 300ppi (pixels per inch). Most books and magazines require 300ppi for photo quality. For example, the chart shows that you can make a 5″ x 7″ photo quality print from a 3 megapixel camera.

Color Codes Matching Chart HTML (CMYK, RGB Hex)

Note that the conversions in this color codes chart are best described as “nominal”. They will produce an invertible conversion between the RGB code and a subset of CMYK; that is, one can take an RGB color code and convert to certain CMYK colors, and from these CMYK colors obtain the matching, original RGB codes.

Designers Toolbox: Postcard Sizes

These are standard postcard sizes. Check with United States Post Office before mailing.

CSS Visual Cheat sheet

A useful and practical reference guide to Cascading Style Sheets Level 2 for web designers and developers. This cheat sheet (3 pages) contains an essential reference to all CSS2 properties with detailed descriptions and some sample code. The simple visual style used to design this sheet allows you to find at a glance everything you are looking for.

Black & White Cheatsheet For Photoshop

Black & White Cheatsheet For Photoshop for designer.

Keyboard shortcuts for Photoshop

A PDF-file with a handy overview of most useful keyboard shortcuts available in Adobe Photoshop.

Photoshop Secret Shortcuts

It is proven that by using software shortcuts can boost up productivity. Here are 30 secret Photoshop shortcuts that I’ve learned from years of experience.

HTML5 Canvas Cheat sheet

The information is pretty much just a copy of what is found in the WHATWG specs, just condensed and hopefully a bit easier to read. There are virtually no explanations, however, and no examples other than some graphics for compositing values and a few other things (the appearance of which is very much inspired by those found in Mozilla’s examples). So, it’s basically just a listing of the attributes and methods of the canvas element and the 2d drawing context.

XHTML Character entitiy reference

This page contains the 252 allowed entities in HTML 4 and XHTML 1.0, as outlined in section 24 of the official HTML 4 specifications, published by the W3C.

Htaccess Cheatsheet

Here is a simple cheatsheet for the .htaccess file.

Designers Toolbox: Standard Foldings

These are standard foldings. Check with your printer to ensure they can produce these foldings. Designers Toolbox is not responsible for errors.

PHP & MySQL for dummies

When writing PHP programs to create your Web database application and communicate with a MySQL database, you have many things to remember. You must spell code correctly and use perfect syntax. This Cheat Sheet provides a reference for quickly looking up the correct syntax for the code you use most frequently.

Adobe Air Cheat Sheet

Adobe After Effects CS4 Cheat Sheet

Denis Klepcha has compiled a convenient chart showing the most used keyboard shortcuts for After Effects. You can download and print this cheat sheet out for your wall to save you from always having to stop what you’re doing and go through the “help” files.

Wikipedia Cheat Sheet

A cheat sheet for Wikipedia editors, with formatting help, useful links and a glossary of common shortcuts.

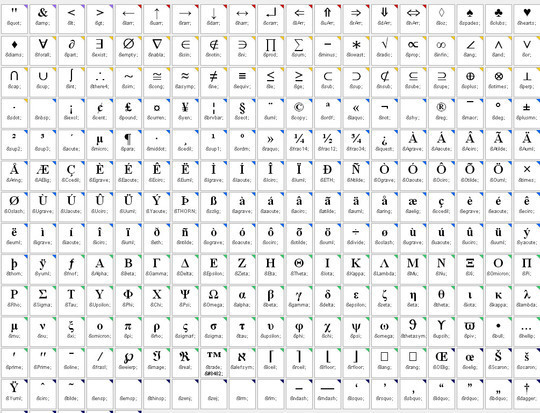
HTML Character Entities Cheat Sheet

I’m forever looking up character codes, so this cheat sheet was a no-brainer. This contains a list of the assigned character codes in HTML, with an example of how they are displayed, and description.

CSS Cheat Sheet (V1)

A quick reference guide for CSS, listing selector syntax, properties, units and other useful bits of information.

Adobe After Effects CS6 Keyboard Shortcuts

You can download and print this cheat sheet out for your wall to save you from always having to stop what you’re doing and go through the “help” files.

Spirals and After Effects

Spirals are used as design guides and elements or paths for text, shapes, and particles. Here’s a few resources for using and creating spirals in After Effects and other Adobe applications.

A side-by-side reference sheet

Interpreted Languages: PHP, Perl, Python, Ruby (Sheet One)

The Gimp Cheat Sheet

CSS Filters / Hacks

PHP Comparison cheat sheet table

VisiBone Font Card

CSS Cheat Sheet

Web Content Accessibility Cheat Sheet

BGColors

Adobe Pen tool Cheat sheet

Photoshop Brush Tool Cheatsheet

Mozilla Firefox Cheat Sheet

Mac OS X Keyboard Cheat Sheet

WordPress Help Sheet Wallpaper

Drupal Theme Developers Wallpaper

Seo html tag

CSS3 Cheat Sheet

CSS Cheat Sheet

via Free and Useful Online Resources for Designers and Developers http://feedproxy.google.com/~r/SmashingApps/~3/hWTmd2Q5iMA/40-must-have-cheat-sheets-for-graphic-designers-and-developers.html

5 Free Windows Programs To Monitor Your Internet Usage

Home internet nowadays comes with a quota of how much bandwidth you can use in a month. It’s unavoidable and if you happen to exceed that quota, your internet provider might charge you a premium, or slow your speeds down to dial-up levels. If you don’t want this to happen to you, then you should monitor your internet usage.

Here are 5 free programs for your Windows PC to help monitor your Internet usage. This is great for readers who are on a student budget, studying abroad on a limited mobile broadband plan. Those broadband plans normally have a quota that includes both upload and download bandwidths and we’ve tested these 5 programs to see how they fare.

1. NetWorx

Once you install NetWorx, it will track all your Internet usage with an icon on the taskbar. You can click and launch the program to view usage graphs of each day. What’s good about NetWorx is the ability to set a daily, weekly or monthly quota to track uploads or downloads or both. You can also set the on/off peak usage that some internet providers have and it’ll warn you if you’re about to reach the limit.

NetWorx

2. BitMeter 2

This program comes with a desktop widget meter graph of your download and upload speeds. Similar to NetWorx, you can add a quota limit — in the case of BitMeter 2, it is named ISP Restrictions. Once set, it’ll tell you how many days and bandwidth you can use before reaching your limit. You can also view your usage stats that can be sorted by hours, days, and months.

BitMeter 2

3. NetSpeedMonitor

This program permanently sits on your taskbar showing upload and download speeds. To enable this, right click on your taskbar and under Toolbars click on NetSpeedMonitor. Apart from showing connection speeds, it can track your daily usage. You can see track your daily or monthly usage, and also see what programs are connected to the internet. Unlike the other programs though, there is no quota reminder.

NetSpeedMonitor

4. Cucusoft Net Guard

This program has a very clean user interface that is easy to understand. Upon installing it, you’ll have to provide an email address to register for a free product code. After that, you can begin tracking your internet usage and even see what programs are connected to the internet. It also allows you to set your monthly quota with reminders sent to you as you near the limit.

Cucusoft Net Guard

5. ISP Monitor

ISP Monitor is a lightweight program to easily track your daily or monthly internet usages. You’ll have to set it up first by changing the adapter settings under Settings > Traffic Monitor > Adapter to choose between a wired or Wi-Fi connection. Unlike the previous programs, you cannot set a quota reminder. It has easy-to-read logs where you can instantly see your daily upload and download usage.

ISP Monitor

via hongkiat.com http://www.hongkiat.com/blog/monitor-internet-usage/

WordPress Tips: Getting More Attention From Visitors With “Blog Stage”

Editor’s note: This is a article by Greg Narayan aka The Blogger, a 25-year-old guy from New York who answers about 150 blog questions before breakfast. Go ask him a question now, and find him on Twitter or via email.

As bloggers and content creators we have a lot to share. Your blog is a platform. But do you ever feel like no one is reading? Yet when you look at your Google Analytics account you see plenty of traffic. So, what’s going on?

customizing wp blog stage

Sadly, the traditional positions of blog post and sidebars aren’t as effective at delivering a message nowadays. Content consumers are quick to bounce and you must be a bit more creative to get their attention.

Good thing your blog/website contains a valuable spot called the “stage”. What/where is the blog stage? Why is it super-useful? Let’s take a look at how to edit, style, and effectively use one of your blog’s hidden hot spots.

Related:

The stage is versatile

Have you heard of a "blog stage”? Well, assuming you didn’t go ballistic on your design and rewired it completely, you should have one.

The stage sits right below the page navigation but above the top post. It’s an ideal place for announcements and subscription forms mostly because it’s where your readers’ eyes naturally go when they visit your blog. The stage is where the majority of readers focus their gaze on your homepage. Think about it, it’s front and dead center.

The cool thing is that the items on your blog stage show up only on the homepage.

Ideas for a blog stage:

  • Product giveaways – Product giveaways need attention, you usually want to direct folks to social media pages.
  • Capturing subscribers – Lots of blogs place neat forms here that allow readers to opt into a list.
  • Soliciting feedback – My stage has an announcement asking for feedback on a recent eBook.

Some easy WordPress coding

Editting the stage is easy – this is definitely beginner-level coding. At the same time it’s a trick you won’t see used too often, so it’s pretty effective.

I should be clear, this won’t work if you use WordPress.org and can’t edit the code. If you use Blogger, you can edit the stage simply by putting an HTML/Text gadget above Blog Posts in the layout tab.

If you use WordPress.org and a reasonable premium theme, this will prove to be easy.

To start, navigate to the dashboard and go to Appearance > Editor. Then go to index.php, and find this code:

<div class="content-loop">

Your stage exists immediately below this code and we’ll put the announcement there.

valuable stage items

What are you eagerly awaiting to tell or show readers? Creating a simple message for your stage is crucial but here are three examples of features I’d put there:

I – The Facebook like box

Built a ‘Like’ Box yet? With Facebook’s developer API, it’s easy. Just choose your settings then hit Get Code, select the ‘iFrame’ option, and insert into your blog stage as indicated above.

‘Like’ boxes look pretty, and even more so when there are thousands of faces of fans who have ‘Liked’ your Facebook page, but if you’re just starting out, that box may not get many inline clicks.

Let’s check out other options you can try.

II – The simple announcement

My first announcement was all about a giveaway contest I ran for Adobe CS. By commenting and ‘Liking’ a blog post, they could win a copy of CS Master Collection at my blog. An awesome offer, but not if nobody knew about it.

As a general rule, this part of your blog is super effective for attracting more blog comments on a certain post.

III – Subscription forms

I talk a lot about Aweber in my writing. They let you design beautiful subscription forms where users can enter their email, name and any other information to join your email list.

These forms are ideal if you want readers to subscribe by email and can be placed in your stage with one line of javascript Aweber generates for you. Alternatively, you can also try MailChimp.

Sure, you could put anything in your stage space. You could put your favorite song via mp3 download or one of those school bus photo displays of you for each year of schooling you did. It’s totally up to you, so be creative.

Watch The Video Tutorial

If it this is all too hard to swallow, here’s the video tutorial for this page.

Homework

Try putting something on your stage now and tweak those messages until you get a winning formula. Remember, keep it simple, simplicity is best. If you have questions, do let me know in the comments.

Hope you’ve enjoyed this WordPress how-to, and stay tuned for more tricks!

via hongkiat.com http://www.hongkiat.com/blog/wordpress-blog-stage/

How To Backup WhatsApp Chat Log From iPhone To Computer

Do you have important WhatsApp chats that you want to save or read without having to press ‘load more’ every, single, time? Or is your WhatsApp starting to slow down because of your bloated (and still growing) chat history and you want to free up some space without losing all those memories inside?

WhatsApp Chat History

With the help of iPhone Backup Extractor and WhatsApp Xtract you can save your WhatsApp chat history in your computer. With a little bit of help from Phyton you can display the chat history in browser view and read it whenever you want.

1. Backup and Extract WhatsApp Data

Connect your iPhone to your computer and open up iTunes. Back up your iPhone.

Note: Make sure that you create an unencrypted backup file as the extractor in the second part of this guide cannot handle encrypted backup files.

iTunes Backup

To extract WhatsApp data from your iPhone backed-up files, download iPhone Backup Extractor and install it. Run the program.

iPhone Backup Extractor

This program will auto-locate the location of your backup files. If your folder is not in the located folder, click the drop-down and ‘Select another backup folder’ and locate your iPhone backup folder.

iPhone Backup Extractor - Select Backup

After locating the backup files, click on Expert Mode.

Expert Mode

Then, click on ‘Application’ to expand it. Find ‘net.WhatsApp.WhatsApp’ and tick on the box next to it. Then click on Extract selected.

net.WhatsApp.WhatsApp

The extracted files will be placed in a folder named ‘Application’. The ‘Application’ folder can be located at the directory you chose after clicking ‘Extract selected’ earlier.

Before we go further, search for ‘ChatStorage.sqlite’ in the same folder. You will need this in the next step.

ChatStorage.sqlite

2. Extract & Read WhatsApp Chat History

So far, we have extracted WhatsApp data from our iPhone files. To read the chat history on the computer, we must first extract it from our WhatsApp data.

To extract, first download WhatsApp Xtract. Extract WhatsApp Xtract to a folder which is convenient for you.

You will see a ‘ChatStorage.sqlite’ in the WhatsApp Xtract folder. Replace it with your own ‘ChatStorage.sqlite’ that has been extracted from your backed up file.

To Read on Browser View

Download and install Phyton. Download the 32bit/x86 version even if you’re running on a 64bit/x64 Windows. If you choose to download the 64bit version, you’ll end up with an error when you try to use it later on.

Phyton

After installing Phyton, go back to the WhatsApp Xtract folder and search for ‘!install pyCrypto.bat’. Run it (or right click and ‘run as administrator’).

Then, run ‘WhatsApp_xtract_iphone.bat’.

WhatsApp_xtract_iphone.bat

Once it is done, it will open in your browser and all your WhatsApp chat history will be displayed.

WhatsApp chat history

Clicking on the ‘Contact Name’ will direct you to the chat history with that contact.

chat history

The HTML file will be stored in the WhatsApp Xtract folder, so you can refer back to that for future use.

WhatsApp Xtract folder

via hongkiat.com http://www.hongkiat.com/blog/backup-whatsapp-to-computer/

20 Best jQuery Plugins for Drag And Drop

Websites are basically an interface with the aid of which the entrepreneurs can communicate with their clients in an impersonal way. Therefore, the developers should make the best effort to develop this interface in such a way so that the visitors get the interest to navigate through the different parts of the website. jQuery is a useful plugin from the JavaScript library that will be extremely useful for enhancing the interactivity of the website.

We have presented in this editorial twenty jQuery plugins with the help the developers to easily integrate the drag and drop feature in their website. These plugins can be downloaded from the website and customized to meet up with the needs of the developers. jQuery plugins have made the scripting of HTML powered webpage much easier. Designers are going to come across many free jQuery plugins on the internet and thus it can be difficult to find the one that is ideal. The drag and drop plugin is particularly useful for the ecommerce sites where the items can be selected and dropped in the shopping cart. Therefore, the use of these drop and drag plugins can positively impact the revenue earning capacity of the website.

All the plugins present in this editorial have been quality tested by us. So the designers can use these drag and drop jQuery plugins in their website confidently to increase the interactive of the website. Make the best use of these jQuery plugins to enhance the user interface of the website.

1. How to Mimic the iGoogle Interface

BJPDD01

Demo & Download

2. Building a drag drop shopping cart

BJPDD02

Demo & Download

3. jquery mb.image Navigator

BJPDD03

Demo & Download

4. Drag & Drop with PHP & jQuery

BJPDD04

Demo & Download

5. Drag Drop Shopping Cart Using JQuery

BJPDD05

Demo & Download

6. Collapsible Drag & Drop Panels Using jQuery

BJPDD06

Demo & Download

7. Drag scrollable

BJPDD07

Demo & Download

8. Drag to Share

BJPDD08

Demo & Download

9. Dynamic Drag’n Drop With jQuery

BJPDD09

Demo & Download

10. Easy Drag jQuery Plugin

BJPDD10

Demo & Download

11. jqDnR

BJPDD11

Demo & Download

12. jquery.event.drag

BJPDD12

Demo & Download

13. jquery mb.containerPlus

BJPDD13

Demo & Download

14. jQuery Drag & Drop Shopping Cart

BJPDD14

Demo & Download

15. Jquery Iviewer

BJPDD15

Demo & Download

16. Jquery Mobile Drag And Drop

BJPDD16

Demo & Download

17. jQuery Reel Plugin

BJPDD17

Demo & Download

18. Map Box

BJPDD18

Demo & Download

19. Table Drag and Drop JQuery plugin

BJPDD19

Demo & Download

20. Text Area Resizer

BJPDD20

Demo & Download

via Web Design Blog, Web Designer Resources http://www.2expertsdesign.com/resources/20-best-jquery-plugins-for-drag-and-drop?source=rss

40 Fresh And Creative Photoshop Text Effects Tutorials

If you are looking for some detailed and professionally created tutorials on creating awesome text effects by using Adobe Photoshop, then you have come to the right place. Below, we have compiled a list of 40 most recent and excellent tutorials on creating text effects by using Photoshop application. We are sure many of you are looking for it. By following these tutorials, you can bring your typography designs to life and make them look more interactive and appealing.

Typography no longer is the arrangement of fonts only rather it has become a medium for the designers to showcase their creative skills and imagination power. In this post, you will find 40 most recent and high quality tutorials on how to use Adobe Photoshop to create awesome and appealing text effects. So, don’t miss the opportunity to liven up your designs. Check this out and get as much as you like! Enjoy and stay creative!

Create a Glowing Liquid Text with Water Splash Effect in Photoshop

In this tutorial, we will show you the steps we took to create a Glowing Liquid Text Effect in Photoshop. We will be practising the use of liquify filter, layer blending options, as well as some image adjustments.

Create a Realistic Wooden 3D Text Image

In this tutorial we are going to take a few 2D textures as well as a few Photoshop techniques to create a realistic 3D text image.

Easy X-Ray Typography In Photoshop

In this tutorial we will show you how to create a simple x-ray effect of a letter, in this case the Abduzeedo logo A. The whole process is quite simple but it will require a couple of hours to pull it off.

Easy Furry Text In Photoshop

In this tutorial we will show you how to create a really cool and super simple furry text in Photoshop CS6. We will use basic filters and tools but it’s nice to say that we took advantage of the a new feature in Photoshop CS6 that is to apply layer styles to folders.

Man Of Steel Symbol

In this tutorial we will show you how to create the Superman, Man of Steel logo using Illustrator and Photoshop.

Create Glossy Plastic Text in Photoshop

Learn a quick and easy way to create reflective plastic text in Photoshop from scratch. Three layer styles will be combined to achieve this effect. We will also explore blending modes and their effective use to achieve this type effect with layer styles.

Frosted Glass Text Effect

This tutorial will explain how to create a beautiful frosted-rolled glass inspired text effect, using Photoshop Filters and Layer Styles.

How to Create Shiny Retro Text with Photoshop

Learn how to create this amazing typographic illustration with colorful type treatment. In this tutorial, Edmar Cisneros will show you how to create this artwork using Photoshop layer styles and special lighting effects.

Create a Knitted Argyle Text Effect

Photoshop plugins are great tools to help you save time and improve the quality of your work. In this tutorial, we will use Filter Forge to help create a knitted argyle text effect in Photoshop that you can use in your holiday illustrations. Let’s get started!

Create an Autumn-Themed 3D Text Effect With Photoshop CS6 Extended

Adobe Photoshop CS6 Extended is packed with an all-new 3D interface and tons of new features. In this tutorial, we will explain how to use those new features to create an autumn-themed 3D text effect. Let’s get started!

Create a “Scary” Text Effect in Photoshop

In this quick tip tutorial, we will show you how to create a “scary” text effect using layer styles in Photoshop. Let’s get started!

Create a Crisp Metallic Text Effect in Photoshop

In this quick tip tutorial, we will explain how to create a crisp, metallic text effect using just a couple of layer styles in Photoshop. Let’s get started!

Create a Stitched Denim Text Effect in Photoshop

In this tutorial, we will explain how to combine Photoshop filters, brushes, and vector shapes to create a stitched denim text effect using Photoshop CS6. Let’s get started!

Create a Bloody Text Effect in Photoshop Using Layer Styles

In this quick tip tutorial we will show you how to create a bloody text effect using layer styles in Photoshop. Let’s get started!

Create a Neon Text Effect in Photoshop

In this tutorial we will show you how to make a neon text effect in Photoshop using layer styles and textures. Let’s get started!

Design an Interesting Cloud Text Effect in Photoshop

In this tutorial, we will show you the steps we took to Design an Interesting Cloud Text Effect in 3 Easy Steps in Photoshop. We will mainly use custom brushsets and utilise brush options to achieve this text effect. This is a beginner level tutorial, have a try.

Create a Dissolved Ancient Ink Text Effect in Photoshop

In this tutorial, we will show you the steps we took to Create a Dissolved Ancient Ink Text Effect in Photoshop. The aim of this tutorial is show you how you can apply layer blending options, eraser tool as well as filter effect to text, in order to produce simple but effective typography in just a few steps.

Create a Frozen Text Effect with Ice Particles in Photoshop

In this tutorial, we will show you the steps we took to Create a Frozen Ice Text Effect in Photoshop. We will mainly go though some selection techniques, as well as layer styles and image adjustments.

Create an Interesting Cookie Bite Text Effect in Photoshop

In this tutorial, we will show you the steps we took to Design a simple Cookie-Bite Text Effect in Photoshop. We will be practising some basic techniques such as the use of quick selection tool, layer masks and layer blending options.

Clouds Text Effect

This tutorial explains how to use simple brushes to create an easy clouds text effect.

Create a Shiny, Gold, Old World Text Effect in Photoshop

In this quick tip tutorial we will show you how to create a shiny, gold, old world text effect using layer styles in Photoshop. Let’s get started!

Create a Sports-Themed Text Effect in Photoshop Using Layer Styles

In this quick tutorial we will show you how to create sports-themed text effect using layer styles in Photoshop. Let’s get started!

Create a Candy Flavored Text Effect in Photoshop

In this quick tip tutorial we will explain how to create a candy cane-style text effect in Photoshop. Let’s get started!

Create a Glass Text Effect in Photoshop Using Layer Styles

In this quick tip tutorial we will show you how to create a glass text effect using layer styles in Photoshop. Let’s get started!

Fabric Text Effect

This Photoshop tutorial explains how to use Layer Styles and two patterns to create a nice looking fabric text effect.

How to Create Happy New Year 2013 Holiday Card

In this tutorial, we are going to create a simple holiday card with colorful digits in Adobe Photoshop CS6. I hope you enjoy this tutorial and that it inspires you to create your own illustration for New Year! Layered PSD file included. Let’s get started!

Create a Realistic Metal Text Effect Using Layer Styles

Today we’ll be showing you how to create a realistic metal text effect using only 2 layers! Sound to good to be true? Well read on… even a beginner can following this quick and easy tutorial.

Create a Polished 3D Gold Bars Text Effect

In this tutorial, we will create a Polished 3D Gold Bars Text Effect.

Multiple Text Strokes With Smart Objects In Photoshop

In this tutorial, we’ll learn an interesting way to create a multi-outline text effect, this time using the power of Photoshop’s Smart Objects! Adobe first introduced Smart Objects back in Photoshop CS2, which means you’ll need CS2 or higher to follow along.

Editable Blurred Type With Layer Styles In Photoshop

In this Photoshop tutorial, we’ll learn how to create fully editable blurred type using layer styles! Specifically, we’ll see how to use the technique to add blurry shadow text to an image.

How to Create Hanging Typography

In this Photoshop tutorial, you will learn how to create this cool hanging typography text using Photoshop and a little bit of Adobe Illustrator.

Create a Cool 3D Graffiti Text Effect using Line Art

In this tutorial, you’ll learn how to take a line art sketch of text and turn it into a 3D graffiti style text effect using some simple techniques and stock images. You’ll learn how to take a concept, add the initial coloring, then use some well placed images to achieve a 3D effect, then finally use some brushes to add awesome extra effects.

Create A Beautiful 3D Text Composition

In this tutorial, Joe Moore will teach you step by step how to render beautiful and visually sharp 3d text in 3D Studio Max, render it using Mental Ray, and then combine it with additional visual elements to create an atmospheric, nature inspired 3D text composition using Photoshop.

Create a Unique Stone and Fire Text Effect in Photoshop

In this tutorial, we will show you the steps we took to Create this interesting Stone and Fire Text Effect in Photoshop. We will heavily use selection tool, image adjustments, liquify techniques as well as layer blending options.

Creating Bold Text that Stands out

A great way to make text stand out is to give it a little pop. In this tutorial we are going to use Adobe Illustrator to make the text pop by giving it some heavy shadows and strokes.

Create a Clean Retro Badge in Adobe Illustrator

In this tutorial we are going to create a clean retro-looking badge/burst in Adobe Illustrator. These are great for adding to a website, advertisement, banner, etc to help the text stand out.

Create a Smoke Text Effect Using Photoshop’s Non-Destructive Tools

In this tutorial we will learn how to create a Smoke Text Effect Using Photoshop’s Non-Destructive Tools.

Easy Chalk Ornament Typography In Photoshop

In this tutorial we will try to create a stylish ornament typography and then apply a chalkboard effect using Adobe Illustrator, Photoshop and some vector ornaments. The whole process is simple but time consuming, so I would take at least 3 hours to recreate this design.

Metal Car Logo Effect In Photoshop

In this tutorial we will show you how to create a nice chrome effect in Photoshop using only Photoshop. The process is a bit long but it is a very useful technique and there is still a lot to evolve in terms of layer styles values.

The Dark Knight Rises Stencil Effect In Photoshop

In this tutorial we will create a stencil and spray effect using basic filters and some brushes. The technique is very simple and I am sure you will use it in your future projects.

via Free and Useful Online Resources for Designers and Developers http://feedproxy.google.com/~r/SmashingApps/~3/WUWJMcba58U/40-fresh-and-creative-photoshop-text-effects-tutorials.html

Eraser icon (PSD)

Pink eraser icon, delete and edit symbol. Download PSD source.

eraser


Resolution: 1280x1024px
Full size JPG preview: Eraser icon

File Format: PSD
Color theme: pink
Author: PSD Graphics
Similar graphic: Blue pencil icon (PSD)

Download Photoshop PSD source:
File Size: 1.19 MB

via PSDGraphics http://www.psdgraphics.com/psd/eraser-icon-psd/

Everything You Need To Know About Google Glass

I’m sure by now, most of us have heard of the potential Google Glass has. In the video you see a few people going through everyday routines while others put it on for more extreme stuff like skydiving.

On their head, is the wearable gadget that gives you the first-person’s view of the experience, made possible by you guessed it, Google Glass.

Glass Sessions

While Google Glass is still currently a developer’s toy, who has the time to wait until it becomes an item for the masses? So we did a little digging, got our fingers dirty and found 10 things you can expect from this high-tech eyewear.

We’ll talk about its hardware, what it’s capable of doing and how it’ll do it. Be prepared for the future as you might see many people wearing the Google Glass when it’s released.

1. Tiny (But Powerful) Hardware

It’s amazing how the Project Glass team has managed to squeeze all of its features into a tiny ‘computer’ supported on a lightweight yet strong frame.

Glass Flexibility

Google Glass is packed with Bluetooth, Wi-Fi, GPS, speakers, a camera, microphone, touchpad and possibly a gyroscope that detects head-tilts. Then there’s the main piece, a tiny screen the size of your finger, that shows you all the information you need at your finger tips.

Glass Prototype
(Image Source: The Verge)

You can tell by the prototype that the design and engineering team have done a great job cramping everything into the current Glass design: a wearable, non-intrusive gadget that doesn’t get in the way of daily life.

2. Heed My Command!

Well, all that hardware is put to good use: Google Glass has voice input, which makes everything a lot more interesting. The built-in microphone combined with Google Now connects you directly to the search engine.

You activate Google Now by saying "Okay Glass" then send a command or question. Tilting your head up does the same thing.

Glass Voice

You can take a photo or record a video, all by just saying the command for it – more on that, later. On the right, is a touchpad where you can swipe through, to get to menus; tapping, registers your selection.

3. Life Pauses for No One

Google Glass users can now live in the moment, and keep that memory in pictures or videos. No more foraging around for a camera, tuning the settings of your photo apps, and letting the moment go by without a single snap. Just say, "Take a Photo" and your view at the moment is captured, hands-free. Imagine the possibiltiies.

Glass Taking Picture

Other than photos, you can do the same with videos, which spells opportunities for extreme sports, real-life tutorials and more. Of course, picture quality coming from a device this small would not be comparable to a DSLR camera, but oftentimes, you’d rather not lose out on the moment.

4. Always On Call, Literally

With Glass being able to record videos, it can also act as a webcam with the data connection from your home or smartphone. You can use Google Hangout for a group conference, and still do what you need to do without being confined to a desk.

Glass Handsfree

The powerful voice input feature also allows you to dictate text messages, attach videos and pictures alongwith and sending it via your mobile data connection, without having to remove your phone from your pocket.

5. Never Get Lost Again

Since it’s built with a GPS chip, it’ll be able to help you navigate, with help from Google Maps. This will take away the need to look down at your smartphone and it will be especially handy when you are driving, when you’re walking through crowded streets or when you’re hiking through the countryside.

Glass Navigation

Travellers, backpackers and even long distant cyclists won’t have to stop and check on where they are. In fact, this is the perfect example of augmented reality.

6. Blend In With The Locals

If you have read this recap on Awesome Things Google Search Can Do For You, know that you can do all of this on Glass as well. What’s the difference? Think about travelling and visiting a place where you don’t speak the local language.

Glass Translate

You can now convert the currency rate, understand the measurement system (metric or not), or translate your questions and their answers on the spot. Get the fun facts, best drinking spots, and gain access to the local secrets when you are still there, not when you are back in your apartment looking through vacation photos.

7. Live from the Field

Live information that is shown to you would come from the predictive software of Google Now. On Android’s Jelly Bean, Google Now knows when you’re leaving your home for work and can warn you of bad traffic before you get stuck in it.

You can also set your favourite sports team and it’ll give you the latest news, scores and updates from the team, whenever they play.

Glass Information

All those features are available on Android, but with Glass, you can skip checking your device and just get it shown to you as and when it happens, or as news feeds. Google Now cards also shows you your boarding pass, next appointment, hotel or restaurant reservations, reminders for important birthdays and events in your calendar.

8. OS Compatibility Not An Issue

Google Glass works not only with Android phones but also with the iPhone, according to this report. Apart from the GPS chip inside, Google Glass is dependent on the Wi-Fi or mobile connectivity to deliver its features. It is only fair game it if is available like any third-party accessory.

Glass Notification

When paired up with your smart device, it can show social network notifications and let you communicate via the same channels as you would on the computer. This removes the need of looking at your smartphone constantly, giving you more time to concentrate on the task at hand.

9. Time for A Make-Over

What is high tech without a sleek and cool design? Google Glass weighed an astounding 8 pounds when it first was announced more than a year ago, but now is seeking to receive nods from the fashion industry.

Already lightweight, and soon to be available in 5 color options (Shale, Tangerine, Charcoal, Cotton and Sky), Google Glass is set to get a make-over with help from eyewear companies.

Glass Colors

The flexibility in design is made possible with different frame and lens shapes — the computing part of Glass can be unscrewed from the current frame and attached onto another. We’re looking forward to a less cyborg, more natural feel to it. But for now, it’s wait and see.

10. Still Elusive But Almost Here

Google first made Glass available to developers during the Google I/O conference. At the time, it was priced at $1,500 and word has it that it will still be within that price range when it is finally released end of this year.

Glass

More recently, participants of the #ifihadglass competition can get an opportunity to buy Glass if they give the most creative Tweet or Google+ comment. For the rest of us, we’ll just have to wait until they iron out the rough edges before we can put on a pair.

(Images courtesy of Google and The Verge.)

via hongkiat.com http://www.hongkiat.com/blog/google-glass/

Web Design: Customize Checkboxes and Radio Buttons with CSS3

With CSS3 we can customize web presentations to be almost anything we want it to be. In this post, as the title says, we are going to customize the look of checkbox and radio input.

These two types of input are a few form elements that are a bit tricky to style (to achieve the same appearance across different platforms) – Windows, OS X and Linux have their own design to display these form elements.

If you want to customize these two form elements, then this tutorial is for you. So, let’s get started.

HTML Markup

We start off by creating a new HTML document. The HTML structure is as follows.

Radio Input

<div class="radio">
	<input id="male" type="radio" name="gender" value="male">
	<label for="male">Male</label>
	<input id="female" type="radio" name="gender" value="female">
	<label for="female">Female</label>
</div>

Checkbox Input

<div class="checkbox">
	<input id="check1" type="checkbox" name="check" value="check1">
	<label for="check1">Checkbox No. 1</label>
	<br>
	<input id="check2" type="checkbox" name="check" value="check2">
	<label for="check2">Checkbox No. 2</label>
</div>

CSS

We are done with the HTML structure, so now let’s put on the styles to these <input>. We will first customize the radio input type. The idea is to turn the default OS design to be as shown in the screenshot below.

Styling Radio Input

First of all, we turn the label cursor to a pointer to indicate that it is clickable then slot in other decorative styles.

label {
	display: inline-block;
	cursor: pointer;
	position: relative;
	padding-left: 25px;
	margin-right: 15px;
	font-size: 13px;
}

Then, we will hide the input radio type.

input[type=radio] {
	display: none;
}

And we replace the hidden input radio type with the pseudo-element :before.

label:before {
	content: "";
	display: inline-block;

	width: 16px;
	height: 16px;

	margin-right: 10px;
	position: absolute;
	left: 0;
	bottom: 1px;
	background-color: #aaa;
	box-shadow: inset 0px 2px 3px 0px rgba(0, 0, 0, .3), 0px 1px 0px 0px rgba(255, 255, 255, .8);
}

The styles above actually also apply to the checkbox input type. The only difference is that the radio input type is a circle. To achive the effect, we add border-radius with a radius size half of the height and width.

.radio label:before {
	border-radius: 8px;
}

At this stage, here is how our radio input type looks like.

Now, we add the small circle inside when this input is checked. We will utilize the CSS3 :checked pseudo-class along with the Bullet HTML character (&#8226;). This bullet will be delivered through content property, thus we need to convert this HTML character for CSS with a Entity Conversion Tool.

input[type=radio]:checked + label:before {
    content: "\2022";
    color: #f3f3f3;
    font-size: 30px;
    text-align: center;
    line-height: 18px;
}

So, when the input radio (which is hidden) is checked or selected, a smaller circle will appear, as shown in the following screenshot.

Alternatively, you can also use an image and show it through the background-image property in :before pseudo-element we have added previously. I didn’t use this as It is my preference to not use images, where possible.

Styling Checkbox Input

Now, we add styles to the checkbox input type. First, we also hide the input element.

input[type=checkbox] {
	display: none;
}

Since we have replaced the input with :before pseudo-element before, we now simply add the border radius.

.checkbox label:before {
	border-radius: 3px;
}

Next we will add the checked sign the same way we did with the radio input type. This time we use Check Mark HTML Character (&#10003;).

input[type=checkbox]:checked + label:before {
	content: "\2713";
	text-shadow: 1px 1px 1px rgba(0, 0, 0, .2);
	font-size: 15px;
	color: #f3f3f3;
	text-align: center;
    line-height: 15px;
}

And here is how our checkbox now looks like.

Final Thought

This is only one technique to customize checkbox and radio input type and certainly you can enhance the look to be more stunning. Also, Since we used CSS3 :checked, this technique will only work in browsers that support it. So, if you prefer, you can also use a jQuery Plugin.

Lastly, you can view the demo and download the source code from the links below.

via hongkiat.com http://www.hongkiat.com/blog/css3-checkbox-radio/

Wallpaper Wednesday: Moon Wallpapers

The Moon, one of the brightest and the biggest object in the sky, at the end of the day, has been a source of inspiration to poets, writers and artists. It is a bewitching sight, to say the least. No night sky is complete without a flicker of moonlight or a dash of moondust.

one night at lake

(Image Source: Fernando Alonso)

In this week’s Wallpaper Wednesday, we are presenting you with our collection of 15 beautiful Moon wallpapers for readers who work the long days, and even longer into the night.

Surreal Luna. Available in 1280×1800.

surreal-luna

Cresent Moon. Available in 2429×1735.

cresent-moon

Half Moon. Available in 2699×1928.

half-moon

Frostbitten Moon. Available in 1920×1080.

frosbitten-moon

Wallpaper Moon. Available in 1240×1024.

wallpaper-moon

Moon. Available in 1680×1050.

moon

Moonlit Christmas Eve Rudolph. Available in 1680×1050.

moonlit-christmas-eve-rudolph

Looking At The Moon. Available in 1400×960.

looking-at-the-moon

Confession To The Moon. Available in 1800×1150.

confession-to-the-moon

Night Time Smile. Available in 1400×946.

night-time-smile

Moonlight. Available in 4000×2500.

moonlight

Shining Moon. Available in 1600×1200.

shinning-moon

Post Meridiem. Available in 1600×1200.

post-meridiem

One Night At Lake. Available in 1600×851.

one-night-at-the-lake

Bloody Red Moon. Available in 1920×1200.

bloody-red-moon

via hongkiat.com http://www.hongkiat.com/blog/ww-moon-wallpapers/